Tuesday, December 21, 2010

Steampunk ship construction

I think I will do this post a little backwards.  Start with what is completed on the ship to date, with the engine, the ray gun and the two bayonets (picked these up at a tag sale, they are from the Indian wars right after the civil war, thought they would look good here, will actually come out of the side a little lower than they are here) just sitting on top for some perspective.  Obviously a great deal is to be added to the top, as said, from the steam engine forward will look very much like the TP Baracuda and all the drive pulleys, belts, etc have to be added to the back as well as a great deal of trim out.  I figure I am about half way finished now.  Anyway, here are the pics, if you want info on the details, it will be below them.


The bottom is close to finished.  Several guns and details have to be added, and where the rear drive wheel joins has to completely reworked.

The hardest part was getting the paint right on the bottom.  Went through about six applications before settling on this one, and it may change again.  Anyway,  I had the frame built and the wheels attached and it was time to make the shell of the bottom.  I used the hoops I had picked up and put ribs all along the bottom.


At this point I was thinking I would cover them with this thick fiberboard.  I tried it and didnt like it.  I realized quickly it would never form correctly over the ribs.


I realized I would have to go back to basic boat building design to get the curve and shape I wanted.  Using basswood, I cut strips and covered the ribs.  I prepainted them with what I thought might look good.  The shape came out fine, but I wasnt happy with the look.  I added some details of things coming out of the side, fueling pipes, couple of cannons or whatever.  These get changed later again.


Ok, wasnt happy with the body, but let it simmer while I worked on the nose of the shell.  I had a what I think was an old planter, some kind of resin material, had some nice designs on it and I had thought for some time it would be the nose of the shell, and that possibly it would have a drop down door and a brass cannon I had would roll out.  I attached it as the nose and it looked good, but I realized it was not large enough for the brass cannon.  So back to the drawing board and the parts bins.


I had 20 heavy spacers I had gotten from ebay that I intend to use as the side top cannons, there would be 18 of them eventually, so I had two extras that I could use for the nose guns.  I cut and hinged a drop down section, mounted the gun barrels, and added some rangefinder lenses I took out of a Polaroid land camera.  I found when it closed that the support chains snagged, but adding a spring pulled them back fine.


So now I had the guns mounted and they would close fine, but now I needed a way for them to be opened and closed by the crew.  I ran a small rope to the back of them and down through the bottom of the nose and built a pulley with a spoke wheel attached to a spindle made from lamp parts, a chain running from the rope through a small block and tackle.  Turning the spoked wheel lifts and closes the entire gun setup nicely.


Next was the cowcatcher.  I bought some 1/16 by 1/2 inch raw steel strips and hammered and bent them into the shapes, ground down points and mounted them on a grooved board with large brass screws that once held my sons bunk beds together.  I cut a round section of wood, cut a groove to hold the tops of the metal strips and it was finished.

At the same time, I rebuilt the front wheels, lengthened their base and trimmed them out.


Thursday, December 2, 2010

Steampunk ship wheels, frame construction

So now I had one of the back pieces for the top of the ship, a rear wheel drive to move it, tracks and trestle for it to sit on, but no ship.  It took a long time for me to come up with the simple solution needed for the internal frame.  I had some general ideas on the wheels, the medium brass ones I knew would work in one way or another, I had bought 6 sets of train wheels on my trip to Litchfield that were the correct size for the track and I had some smaller train wheels that I knew would be in the front behind the cowcatcher.  I had a hazy notion of how I would probably attach all these, and finally came up with a design that would incorporate those ideas.  In the end it was quite simple.  A strong center board running down the bottom of the length of the deck.


I had also been thinking a lot about how I would frame out the body of the boat, get that even somewhat circular shape around it.  Driving to a tag sale one Saturday, I was thinking that maybe Michaels would have basket material that I could bend around it and decided to go there after I hit the sale. (always looking for those odd parts)  The first thing I saw in the driveway was a box of hoops, all different sizes, they were embroidery hoops--perfect.  I bought the whole box for a song and half of one is what you see in the front of the above picture.  More will show up later.

I made a frame for the small front train wheels and attached them to the ship frame.  Later that design was totally changed.


Now I was ready to attach the main wheels.  I had done a basic layout earlier.   You can also see some of the steam engines that I had been thinking of using.


I propped up the frame and decided this would be the way it would be assembled.

I had figured out how I will attach the front wheels and the center group, but hadn't figured out how to attach the rear brass ones.  I had an old pair of wooden crutches I was going to throw away.  Looking at them I realized that if I cut off  the part that went under your arm it would be the perfect size in length to hold the wheels with the crutch turned upside down.  This is the result.


Next were the main center support wheels using the six sets of train wheels.  Dowels were used to make posts going to a small beam across the wheels.  It came out like this.


Monday, November 29, 2010

Steampunk construction, design, laser, ship supports, train track

Clicking pictures will enlarge them.

Once I had decided that the laser cannon was just going to be a part of a larger piece, it was time to think about scale and what to do next.  I decided to build the tracks and trestle.  I made a trip to Litchfield to Toms Antiques, actually it is more than that.  He has many great pieces, but I guess he never threw anything away, broken or not.  Fantastic collection of the most esoteric junk you have ever seen.  Parts and pieces of all kinds of things, old things.  The small man in the mech is from there, a train person for decoration, probably from the early 40s.  There I found what I think is g scale 3 rail track, very old.  Still not realizing how large this thing was going to be, I only bought 4 sections, a week or so later I had to go back for two more.  When I was trying to figure out what I would use for the trestle, I remembered a year or so ago I had bought a wine rack that had never been put together.  It was made of octagon shaped oak logs about 10 inches long that you put together with pegs.  I cut support pieces on an angle and used full pieces for the cross members, attached my rails and was ready to go.  I actually had to redo the whole thing because I needed the pair of rails to be the correct distance apart in the future to handle HO scale wheels for the front supports to the whole piece.  When you make something from scratch and the plans are only the ones in your head that come to you in that dreamy state before you sleep, there are a lot of do overs.  The six sections gave me a length of almost four feet, which was perfect.  I painted it with driveway resurfacing material to give it that creosote look of a real train trestle.  Like many things at this point, it has some final things that have to be done to it, like putting a brass bolt in each of the holes where a peg would have been for a wine rack.  But here it is.


Here is my first try at wheels, before I designed and built the rear drive wheel that follows.  The front wheels, slightly changed will be similar in the final ship, just more of them.  This was before painting the trestle and making it longer.


The second part I had been focused on was the rear drive wheel.  By now I had gathered a quantity of brass parts to choose from.  I finally settled on two heavy 4.5 inch brass disks that were the bases for a pair of large lamps.  Each wheel is two pieces, the inside piece is a thinner brass lamp part, it is spaced so that they straddle an individual rail to maintain stability.  I knew I wanted the piece to have some sort of animal look.  I carved the general form of a snake head from a piece of two by four, routed it out for the wheel to fit up into it and cut a hole in the top for the drive belt to go through.  The pulley inside between the wheels was made from some small bell shaped disks from another lamp.  I covered the whole thing in some antique patterned thick leather and added some brass eyes.  Haven't decided yet whether I will give it some fangs.  I had two brass tube arm pieces from a chandelier I liked to make the supports.  They were not the right size, it was difficult bending them to the exact position needed but finally got them so that they would hold a pulley wheel in place on top and used another chandelier piece for the axle to fit into.  The pulley belt is polycord, which you can cut to any needed length and melt together.  The top pulley wheel (sprocket) is antique meccanno, as will be most of the others in the finished piece.  I picked them up in England on ebay.  The top wheel will be chain driven.  There is still some touch up to be done, like covering the black screw heads with some material.


Sunday, November 28, 2010

Steampunk concept for Barnum's Dream, Concept and Beginning, Credits, Sormann


Barnum's Dream is conceptually based on a piece by Michael Sormann, the TP Barracuda pictured above.  It has long been a favorite of mine.   In trying to name it, I was playing with ideas and flipped the T.P. to P.T. and then of course, Barnum came to mind.  A fanatical showman with a flair for the strange and odd, he would have probably enjoyed such a machine, from its scale to its diabolical nature.  The machines of “The Wild Wild West” also influenced certain concepts.   The finished piece will use much of Sormann’s design, some of it a copy, but with many changes and concepts that are my own.  The front half will be be very close to the original, but the back half will contain the steam engine and the large laser cannon and Gattling gun.    Mr. Sormann has graciously given me permission to use his work as my starting point.  If you are not familiar with his fantastic imagination and work, check him out at the following link.  http://www.sormann3d.com/   I consider my piece to be Steampunk in concept but not in maybe its purest sense.  I have incorporated some of my own interpretations to the functionality of such a machine, one being, the scale is so huge that even the operating parts of the machine would have required more strength and size than a mere human, therefore, almost everything had to be moved and operated by “mechs”, steam driven robots if you will.  It will be as if we are stuck in the style of the Victorian era and in terms of power, we only have steam, utilizing it as our basic power source to do everything from operating machines to firing cannons.  (Some cannons on the final ship will be steam powered, some traditional black powder).  But even though we are stuck in a steam era, we have still made the technological progress to be able to build advanced creations such as massive laser cannons.   I will be posting pictures of the work in progress.  Sometimes I just work on a component of the ship that interests me at the time, or when an idea comes to fruition.  Many sections are developed at the same time, I consider none of them finished as I am constantly changing things when I feel it improves the look or performance.

For many years I have collected odds and ends, motors, gears, oddball junk found at tag sales and dumpster diving from Staples to Colt firearms.  I always had in mind that I would build some type of "artistic" machine.  I have dabbled in art, painting, some sculpting but have always wanted to create some large static piece, maybe a Rube Goldberg type machine.   Instead, this is where I landed.

For some time I have enjoyed steampunk pieces, and have admired the work of others.  I had modded a 5 mw laser pointer to 50mw and thought, this could power something larger. That’s when I decided to build a steampunk laser using the pointer as the light source.  I had odds and ends of brass laying around and started buying brass lamps and chandeliers for parts to use.   This was first go at it, followed by stage two after adding the Gatling gun but not the laser.


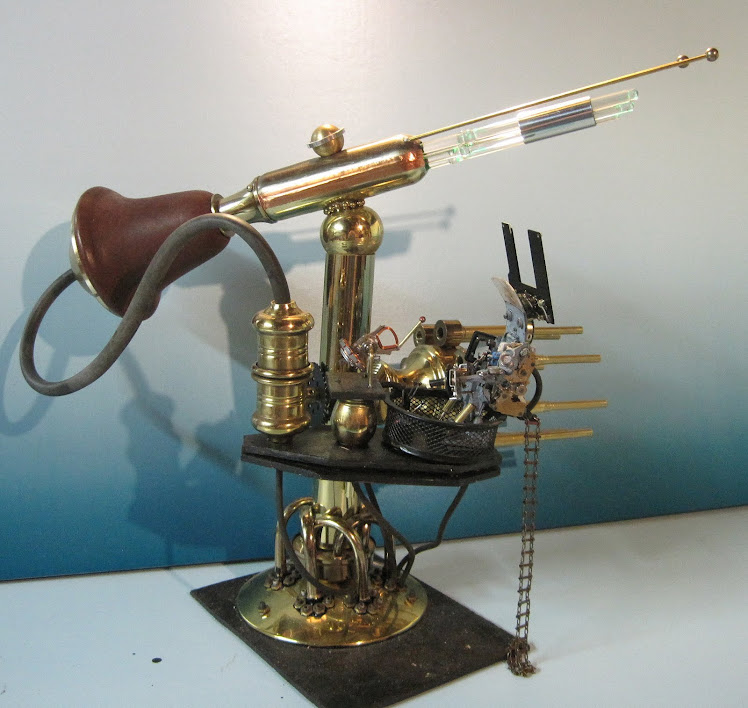
The latest result is the first picture at the top of the blog.  The entire piece is made from the lamp parts and found objects (by that I mean things that were picked up at junk shops, tag sales, manufacturers castoffs, junk yards)  except for the barrels to the gatling gun, they are made from an assemblage of brass tubes that were bought at a hobby shop.  The mech is the skeleton of one my nephew's transformers and he sits in a paperclip basket from Staples garbage.   The ladder used to access the mech is made from a cuckoo clock winding chain with toothpicks as the crosspieces.  The laser is encased in bell shaped piece from a lamp part I covered with lambskin, stretched and stitched to its form.  The wiring is hidden in the various “steam” tubes that run around the device.  Batteries are held in the canister on the platform, but will be used only as backup in the final structure, as all of it will be powered by a real “live steam” engine that will run a small generator.  This engine will eventually drive all the mechanisms on the ship, including the Gatling gun, which will turn through a chain drive connected to a series of pulleys and then to the flywheel of the steam engine.  The laser is powerful enough to project an image through the glass tubes for a few hundred feet.  At 20 feet, a bright image on a wall will be about three feet in diameter and is visually quite strange and interesting.  The glass tubes glow a bright green when it is firing.  It can rotate a full 360 degrees.
The mech, as mentioned before, is a made from the core movable parts of a toy transformer.  It has been extensively modded, mostly from parts from disassembled single lense reflex cameras.  The levers in front of the mech match the smaller ones in front of the driver, the idea being that when he moves one, the mech will move the corresponding one in front of him.  At the top of the mech is the shutter from a reflex camera, which can be lowered and closed to protect the driver when he is in full firing mode.  The large engagement lever in front of the mech is how the laser is turned on.  It is made from an armature from a hard drive inserted through a section of step motor from the same hard drive with brass pieces soldered to it.  It is spring loaded to keep it in an open position, but when engaged will stay in place.
The scale is approximately one inch to six feet.  This is based on the small man driving the mech (you can spot him in the center of the mech if you look close), he is about one inch tall.  This makes the entire laser about 60 feet tall.  This scale became a problem later, as I started out with it as a freestanding project.  When I decided to build the entire ship, with the laser as a part of it, I realized the entire ship would need to be about 4 feet long, which would make the ship in reality about 300 feet long.  Oh well.

Below are pictures of the laser thus far with some details on the mech and controls.

View of full laser a.


View of full laser b.


Control platform


Mech fully open


Mech, blast shield lowered but not closed


Mech, blast shield closed


Gatling gun


Control levers