Steampunk, steam engine, laser cannon Gatling gun, steampunk machine, steampunk war machine, cannon, war machine, steampunk train, train tank, train war, steampunk ship, war ship, model, sormann, brass steampunk parts, steampunk concept, steampunk model, steampunk ship, steampunk concept, steampunk train
Friday, August 31, 2012
Friday, February 24, 2012
There have been many new additions, moving parts, and details made and hopefully soon I will have the pictures and posts up. I have also decided that the machine will be for sale when completely finished, which should be in early summer. Just one picture for now, the rear drive wheel carrier now looks like this.
Sunday, August 21, 2011
Sunday, June 12, 2011
Posts?
Been very busy but have been making some real progress. Decided I wont add any more posts until the top front section is done, or nearly done. And it will be done soon. Some neat mechanical and moving things, all still powered by the steam engine.
Hey, if anyone has any suggestions to make this better, feel free to leave them in the comments. Always looking for ideas.
Saturday, January 15, 2011
Testing the steam engine
Finally decided it was time to test the steam engine, see if it had the power to run all the devices on the ship. I set it up temporarily on a piece of plywood, but with the same configuration it will have on the ship. I was pleased, it was only running at half power and with that could have run several more things. Running the generator later will be no problem as well as a complex set of machinery that will be in the front section, if I ever get to it. The engine turns a main drive shaft with an extra flywheel that then goes to the back driveshaft and to the rear drive of the ship. That shaft then reconnects to a gearbox that turns the chain to the Gatling gun. This little gearbox with a screwdrive was essential because I had to change the direction of the drive pulleys as the gun faces the rear. This piece came out of an old betamax video machine. Sony built good stuff back then.
Heres the firebox of the engine, uses a minature camp stove running on butane.
The sony gearbox, will be painting and cleaning it up later, giving it some patina.
Picture of the whole setup
And a video of it running and at the end the laser firing
Heres the firebox of the engine, uses a minature camp stove running on butane.
The sony gearbox, will be painting and cleaning it up later, giving it some patina.
Picture of the whole setup
And a video of it running and at the end the laser firing
Wednesday, January 12, 2011
Cowcatcher steam harpoon
Decided the cowcatcher on the main ship looked too plain. Had wanted to mount a harpoon somewhere that could be used to snag an enemy you were chasing. When it is mounted on the ship, there will be a cable that will be attached to the harpoon with a reel mechanism. The rangefinder lense is from an 8 mm camera and is still operational, diaphragm will open and close. Steam tubes to fire it will be added when it is mounted on the ship.
Added a control mechanism on the right. Part from an 8 mm camera. Built a canister in the rear as a steam pressure chamber. Turning the cogged wheel on the right turns the wheel which allows more pressure to the cannon. The gauge is set according to the distance found by the rangefinder which allocates the correct amount of steam to not overfire or underfire the cannon. Pressing a button on the back of the mechanism sets it back to S or 0, it is fully functional
Wednesday, January 5, 2011
Lasers, pulleys, metal shielding and redos
Just a short post to update what I have been up to. Wasn't satisfied with the way the main drive wheel was looking and at the suggestion of my nephew Mendel, redid the whole thing. Took the leather off and covered it in metal and antiqued the brass using a technique shared with me by Steamworkshop, dont know his name but you can see his work here. http://www.etsy.com/shop/steamworkshop. Heres how it turned out.
Also built two axle supports that will hold the pulleys to drive the various mechanisms on the ship. The were made from candle holders that were cut to size and soldered bearings for the axles. Will be testing them soon to make sure the steam engine can power everything without adding a third flywheel. Will post a video of that if it runs well.
Also made a picture of the laser in full firing mode, not the best pic, but it gives you an idea of what it looks like.
Also built two axle supports that will hold the pulleys to drive the various mechanisms on the ship. The were made from candle holders that were cut to size and soldered bearings for the axles. Will be testing them soon to make sure the steam engine can power everything without adding a third flywheel. Will post a video of that if it runs well.
Also made a picture of the laser in full firing mode, not the best pic, but it gives you an idea of what it looks like.
Tuesday, December 21, 2010
Steampunk ship construction
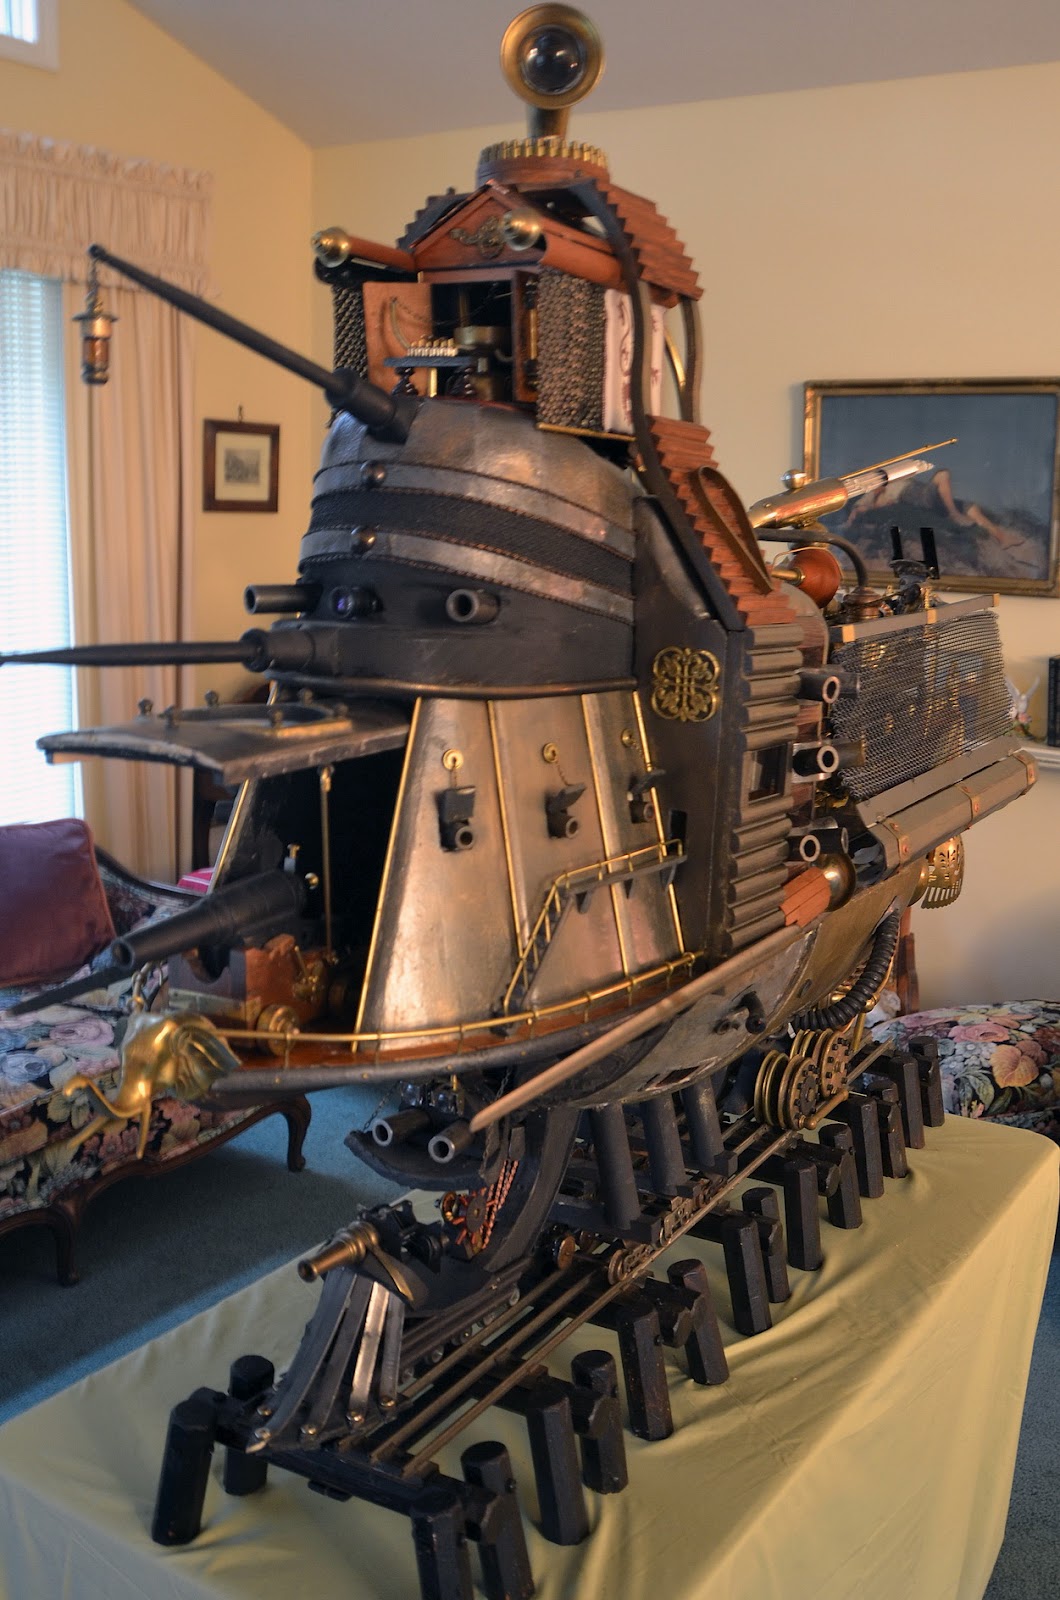
I think I will do this post a little backwards. Start with what is completed on the ship to date, with the engine, the ray gun and the two bayonets (picked these up at a tag sale, they are from the Indian wars right after the civil war, thought they would look good here, will actually come out of the side a little lower than they are here) just sitting on top for some perspective. Obviously a great deal is to be added to the top, as said, from the steam engine forward will look very much like the TP Baracuda and all the drive pulleys, belts, etc have to be added to the back as well as a great deal of trim out. I figure I am about half way finished now. Anyway, here are the pics, if you want info on the details, it will be below them.
The bottom is close to finished. Several guns and details have to be added, and where the rear drive wheel joins has to completely reworked.
The hardest part was getting the paint right on the bottom. Went through about six applications before settling on this one, and it may change again. Anyway, I had the frame built and the wheels attached and it was time to make the shell of the bottom. I used the hoops I had picked up and put ribs all along the bottom.
At this point I was thinking I would cover them with this thick fiberboard. I tried it and didnt like it. I realized quickly it would never form correctly over the ribs.
I realized I would have to go back to basic boat building design to get the curve and shape I wanted. Using basswood, I cut strips and covered the ribs. I prepainted them with what I thought might look good. The shape came out fine, but I wasnt happy with the look. I added some details of things coming out of the side, fueling pipes, couple of cannons or whatever. These get changed later again.
Ok, wasnt happy with the body, but let it simmer while I worked on the nose of the shell. I had a what I think was an old planter, some kind of resin material, had some nice designs on it and I had thought for some time it would be the nose of the shell, and that possibly it would have a drop down door and a brass cannon I had would roll out. I attached it as the nose and it looked good, but I realized it was not large enough for the brass cannon. So back to the drawing board and the parts bins.
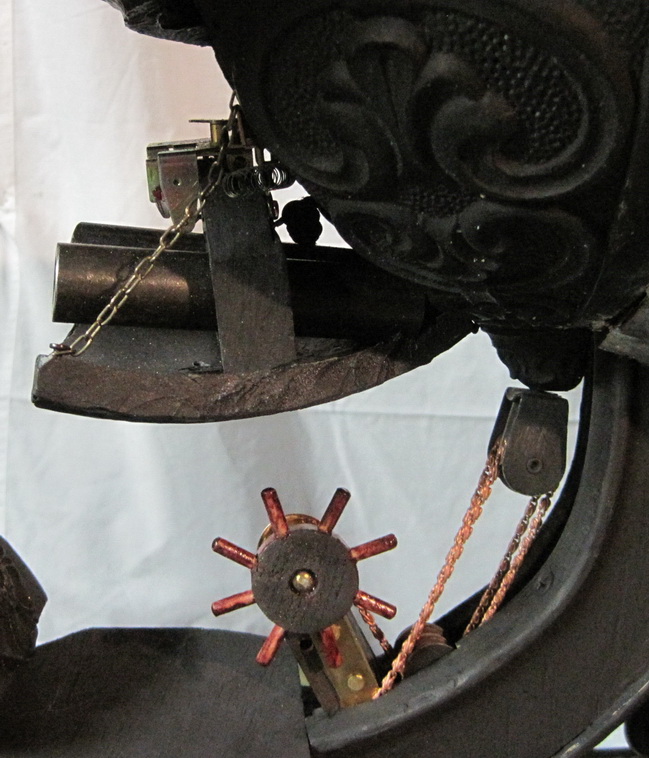
I had 20 heavy spacers I had gotten from ebay that I intend to use as the side top cannons, there would be 18 of them eventually, so I had two extras that I could use for the nose guns. I cut and hinged a drop down section, mounted the gun barrels, and added some rangefinder lenses I took out of a Polaroid land camera. I found when it closed that the support chains snagged, but adding a spring pulled them back fine.
So now I had the guns mounted and they would close fine, but now I needed a way for them to be opened and closed by the crew. I ran a small rope to the back of them and down through the bottom of the nose and built a pulley with a spoke wheel attached to a spindle made from lamp parts, a chain running from the rope through a small block and tackle. Turning the spoked wheel lifts and closes the entire gun setup nicely.
Next was the cowcatcher. I bought some 1/16 by 1/2 inch raw steel strips and hammered and bent them into the shapes, ground down points and mounted them on a grooved board with large brass screws that once held my sons bunk beds together. I cut a round section of wood, cut a groove to hold the tops of the metal strips and it was finished.
At the same time, I rebuilt the front wheels, lengthened their base and trimmed them out.
The bottom is close to finished. Several guns and details have to be added, and where the rear drive wheel joins has to completely reworked.
The hardest part was getting the paint right on the bottom. Went through about six applications before settling on this one, and it may change again. Anyway, I had the frame built and the wheels attached and it was time to make the shell of the bottom. I used the hoops I had picked up and put ribs all along the bottom.
At this point I was thinking I would cover them with this thick fiberboard. I tried it and didnt like it. I realized quickly it would never form correctly over the ribs.
I realized I would have to go back to basic boat building design to get the curve and shape I wanted. Using basswood, I cut strips and covered the ribs. I prepainted them with what I thought might look good. The shape came out fine, but I wasnt happy with the look. I added some details of things coming out of the side, fueling pipes, couple of cannons or whatever. These get changed later again.
Ok, wasnt happy with the body, but let it simmer while I worked on the nose of the shell. I had a what I think was an old planter, some kind of resin material, had some nice designs on it and I had thought for some time it would be the nose of the shell, and that possibly it would have a drop down door and a brass cannon I had would roll out. I attached it as the nose and it looked good, but I realized it was not large enough for the brass cannon. So back to the drawing board and the parts bins.
I had 20 heavy spacers I had gotten from ebay that I intend to use as the side top cannons, there would be 18 of them eventually, so I had two extras that I could use for the nose guns. I cut and hinged a drop down section, mounted the gun barrels, and added some rangefinder lenses I took out of a Polaroid land camera. I found when it closed that the support chains snagged, but adding a spring pulled them back fine.
So now I had the guns mounted and they would close fine, but now I needed a way for them to be opened and closed by the crew. I ran a small rope to the back of them and down through the bottom of the nose and built a pulley with a spoke wheel attached to a spindle made from lamp parts, a chain running from the rope through a small block and tackle. Turning the spoked wheel lifts and closes the entire gun setup nicely.
Next was the cowcatcher. I bought some 1/16 by 1/2 inch raw steel strips and hammered and bent them into the shapes, ground down points and mounted them on a grooved board with large brass screws that once held my sons bunk beds together. I cut a round section of wood, cut a groove to hold the tops of the metal strips and it was finished.
At the same time, I rebuilt the front wheels, lengthened their base and trimmed them out.
Thursday, December 2, 2010
Steampunk ship wheels, frame construction
So now I had one of the back pieces for the top of the ship, a rear wheel drive to move it, tracks and trestle for it to sit on, but no ship. It took a long time for me to come up with the simple solution needed for the internal frame. I had some general ideas on the wheels, the medium brass ones I knew would work in one way or another, I had bought 6 sets of train wheels on my trip to Litchfield that were the correct size for the track and I had some smaller train wheels that I knew would be in the front behind the cowcatcher. I had a hazy notion of how I would probably attach all these, and finally came up with a design that would incorporate those ideas. In the end it was quite simple. A strong center board running down the bottom of the length of the deck.
I had also been thinking a lot about how I would frame out the body of the boat, get that even somewhat circular shape around it. Driving to a tag sale one Saturday, I was thinking that maybe Michaels would have basket material that I could bend around it and decided to go there after I hit the sale. (always looking for those odd parts) The first thing I saw in the driveway was a box of hoops, all different sizes, they were embroidery hoops--perfect. I bought the whole box for a song and half of one is what you see in the front of the above picture. More will show up later.
I made a frame for the small front train wheels and attached them to the ship frame. Later that design was totally changed.
I had also been thinking a lot about how I would frame out the body of the boat, get that even somewhat circular shape around it. Driving to a tag sale one Saturday, I was thinking that maybe Michaels would have basket material that I could bend around it and decided to go there after I hit the sale. (always looking for those odd parts) The first thing I saw in the driveway was a box of hoops, all different sizes, they were embroidery hoops--perfect. I bought the whole box for a song and half of one is what you see in the front of the above picture. More will show up later.
I made a frame for the small front train wheels and attached them to the ship frame. Later that design was totally changed.
Now I was ready to attach the main wheels. I had done a basic layout earlier. You can also see some of the steam engines that I had been thinking of using.
I propped up the frame and decided this would be the way it would be assembled.
I had figured out how I will attach the front wheels and the center group, but hadn't figured out how to attach the rear brass ones. I had an old pair of wooden crutches I was going to throw away. Looking at them I realized that if I cut off the part that went under your arm it would be the perfect size in length to hold the wheels with the crutch turned upside down. This is the result.
Next were the main center support wheels using the six sets of train wheels. Dowels were used to make posts going to a small beam across the wheels. It came out like this.
Monday, November 29, 2010
Steampunk construction, design, laser, ship supports, train track
Clicking pictures will enlarge them.
Once I had decided that the laser cannon was just going to be a part of a larger piece, it was time to think about scale and what to do next. I decided to build the tracks and trestle. I made a trip to Litchfield to Toms Antiques, actually it is more than that. He has many great pieces, but I guess he never threw anything away, broken or not. Fantastic collection of the most esoteric junk you have ever seen. Parts and pieces of all kinds of things, old things. The small man in the mech is from there, a train person for decoration, probably from the early 40s. There I found what I think is g scale 3 rail track, very old. Still not realizing how large this thing was going to be, I only bought 4 sections, a week or so later I had to go back for two more. When I was trying to figure out what I would use for the trestle, I remembered a year or so ago I had bought a wine rack that had never been put together. It was made of octagon shaped oak logs about 10 inches long that you put together with pegs. I cut support pieces on an angle and used full pieces for the cross members, attached my rails and was ready to go. I actually had to redo the whole thing because I needed the pair of rails to be the correct distance apart in the future to handle HO scale wheels for the front supports to the whole piece. When you make something from scratch and the plans are only the ones in your head that come to you in that dreamy state before you sleep, there are a lot of do overs. The six sections gave me a length of almost four feet, which was perfect. I painted it with driveway resurfacing material to give it that creosote look of a real train trestle. Like many things at this point, it has some final things that have to be done to it, like putting a brass bolt in each of the holes where a peg would have been for a wine rack. But here it is.
Here is my first try at wheels, before I designed and built the rear drive wheel that follows. The front wheels, slightly changed will be similar in the final ship, just more of them. This was before painting the trestle and making it longer.
The second part I had been focused on was the rear drive wheel. By now I had gathered a quantity of brass parts to choose from. I finally settled on two heavy 4.5 inch brass disks that were the bases for a pair of large lamps. Each wheel is two pieces, the inside piece is a thinner brass lamp part, it is spaced so that they straddle an individual rail to maintain stability. I knew I wanted the piece to have some sort of animal look. I carved the general form of a snake head from a piece of two by four, routed it out for the wheel to fit up into it and cut a hole in the top for the drive belt to go through. The pulley inside between the wheels was made from some small bell shaped disks from another lamp. I covered the whole thing in some antique patterned thick leather and added some brass eyes. Haven't decided yet whether I will give it some fangs. I had two brass tube arm pieces from a chandelier I liked to make the supports. They were not the right size, it was difficult bending them to the exact position needed but finally got them so that they would hold a pulley wheel in place on top and used another chandelier piece for the axle to fit into. The pulley belt is polycord, which you can cut to any needed length and melt together. The top pulley wheel (sprocket) is antique meccanno, as will be most of the others in the finished piece. I picked them up in England on ebay. The top wheel will be chain driven. There is still some touch up to be done, like covering the black screw heads with some material.
Once I had decided that the laser cannon was just going to be a part of a larger piece, it was time to think about scale and what to do next. I decided to build the tracks and trestle. I made a trip to Litchfield to Toms Antiques, actually it is more than that. He has many great pieces, but I guess he never threw anything away, broken or not. Fantastic collection of the most esoteric junk you have ever seen. Parts and pieces of all kinds of things, old things. The small man in the mech is from there, a train person for decoration, probably from the early 40s. There I found what I think is g scale 3 rail track, very old. Still not realizing how large this thing was going to be, I only bought 4 sections, a week or so later I had to go back for two more. When I was trying to figure out what I would use for the trestle, I remembered a year or so ago I had bought a wine rack that had never been put together. It was made of octagon shaped oak logs about 10 inches long that you put together with pegs. I cut support pieces on an angle and used full pieces for the cross members, attached my rails and was ready to go. I actually had to redo the whole thing because I needed the pair of rails to be the correct distance apart in the future to handle HO scale wheels for the front supports to the whole piece. When you make something from scratch and the plans are only the ones in your head that come to you in that dreamy state before you sleep, there are a lot of do overs. The six sections gave me a length of almost four feet, which was perfect. I painted it with driveway resurfacing material to give it that creosote look of a real train trestle. Like many things at this point, it has some final things that have to be done to it, like putting a brass bolt in each of the holes where a peg would have been for a wine rack. But here it is.
Here is my first try at wheels, before I designed and built the rear drive wheel that follows. The front wheels, slightly changed will be similar in the final ship, just more of them. This was before painting the trestle and making it longer.
The second part I had been focused on was the rear drive wheel. By now I had gathered a quantity of brass parts to choose from. I finally settled on two heavy 4.5 inch brass disks that were the bases for a pair of large lamps. Each wheel is two pieces, the inside piece is a thinner brass lamp part, it is spaced so that they straddle an individual rail to maintain stability. I knew I wanted the piece to have some sort of animal look. I carved the general form of a snake head from a piece of two by four, routed it out for the wheel to fit up into it and cut a hole in the top for the drive belt to go through. The pulley inside between the wheels was made from some small bell shaped disks from another lamp. I covered the whole thing in some antique patterned thick leather and added some brass eyes. Haven't decided yet whether I will give it some fangs. I had two brass tube arm pieces from a chandelier I liked to make the supports. They were not the right size, it was difficult bending them to the exact position needed but finally got them so that they would hold a pulley wheel in place on top and used another chandelier piece for the axle to fit into. The pulley belt is polycord, which you can cut to any needed length and melt together. The top pulley wheel (sprocket) is antique meccanno, as will be most of the others in the finished piece. I picked them up in England on ebay. The top wheel will be chain driven. There is still some touch up to be done, like covering the black screw heads with some material.
Subscribe to:
Posts (Atom)